Tuesday, December 30, 2014

Prosciutto Wrapped Asparagus

These little delights are something I had never tried before. I had never ventured in to the prosciutto world! Oh for the love, these are good! They give you a little bit of salty, a little bit of crunch, with the deliciousness of asparagus. Did I mention they are SUPER easy and quick? These are the perfect appetizer to serve at a party. Not only are they low maintenance, but they are not a high calorie food. Protein and veggies. Boom! Take that waistline!

I served these on Christmas, and I had more than my fair share. They were so good, I totally spaced on taking pictures of ALL the food we ate on Christmas... I remembered to snap some photos when we had packed everything away. Shoot! Well at least we had some leftovers to take pictures of!

This picture doesn't doe these babies justice. Jason cut them in half to fit them in the container. I served them whole. Here are the simple instructions or find them on my Pinterest:

Prosciutto Wrapped Asparagus:

2 packages of Prosciutto
1 bushel of Asparagus
1 tbsp of Coconut Oil

I washed and cut the bottoms off of the asparagus. I cut each of the pieces of prosciutto in half. From there I place the prosciutto at and angle and roll it onto the asparagus. I started at one of the corners, and wrap it tightly.
I cooked everything in a cast-iron pan with about 1 tsp of coconut oil. They only cook for about 2-3 minutes. Once you see the prosciutto start to brown they are done. We of course did a taste test before we served them to make sure they were edible. :-)
I served them immediately after they were cooked. Delicious!

Enjoy!

-Motivated Mommy Clayton

You can always find me on my Beachbody website.

Monday, December 29, 2014

Homemade Laundry Detergent!!

Have you ever looked into what is REALLY in your laundry detergent? Have you ever read the list of ingredients? Do you ever get tired of how much you spend on your over priced cleaner? Well I answered yes to all of these questions. When I realized that I could save a TON of money, and know exactly what was going into my laundry detergent I made the switch. Both of our kiddos have had sensitive skin, and your laundry detergent is the first place the doctor recommends you start.

I am slowly eliminating most of the unneeded chemicals in our lives, and working towards buying locally. I strive to support local businesses, and to keep the money within our community. The more you buy local, and support organic produce, the lower the cost will be in the future. Even if you are only able to buy a couple bananas, it is a start.

This year I decided to give this laundry detergent as a Christmas gift. It is SUPER practical, and it didn't cost a pretty penny. I was able to give an ample amount of it, and still give plenty of other gifts without breaking the bank.

They turned out super cute! I just added a ribbon to the mason jars, and Wa-lah!

Sometimes the best gifts are homemade! It is something I know that they will use.

Here is the super quick and EASY recipe! I'm not kidding when I say this takes me less than 20 minutes to make. The longest part of the process is pouring it into containers.


Homemade Laundry Detergent Process:

What you need:
1/3 of a bar of Fels-Naptha soap
1/2 cup of Borax
1/2 cup of Arm & Hammer Super Washing Soda
1 large 2 gallon bucket
Empty laundry detergent buckets, or a container to store your final product in
**Optional** Essential Oils

1. In a pot, boil 1/3 of a grated Fels-Naptha soap bar and 6 cups of water over medium high heat. If you heat it to fast, it will get very sudsy.
2. Once the soap is dissolved, add the Borax and Washing Soda to the pot. Stir ingredients until everything is dissolved.
3. Remove pot from heat, and let cool.
4. Pour 4 cups of water into the large bucket and add soap mixture. Stir.
5. Add 22 cups (1 gallon + 6 cups) of water to the mixture. Stir.
6. If you would like to add essential oils, this would be where you would do that. I would add 5-10 drops. I enjoy the scent of the Fels-Naptha so I do not add any oil. I add oils to my homemade fabric softener instead.
7. Add the mixture to your containers.

I generally use a cap full when doing laundry. It is totally up to you how much you feel you need. I would say 2 tablespoons tops.

Make sure to shake your container before using. It tends to get a little thick. I try not to fill my containers to full, so that I have room to shake the mixture when I use it.

Enjoy!

-Motivated Mommy Clayton

You can always find me at my Beachbody website!

Sunday, December 28, 2014

5 Ingredient Fruit Salsa


Looking for a sweet and refreshing way to spice up your appetizer list? This is the perfect dish to do that. It is an excellent addition that doesn't harm your diet. This gem was a hit in our family on Christmas this year. I found it on Pinterest!


I decided this year to have everyone over to our house and change it up. I cleaned up all of our dishes and made them diet friendly, without sacrificing the flavor. This is a preview post of what is to come in the next couple of weeks!

5 Ingredient Fruit Salsa:
2 diced Pears
1 seeded Pomegranate
1/2 cup chopped Cilantro
1/4 of a Red Onion
1 juiced lime

Combine all ingredients and indulge! I ate them with chips, but you can put them on salad, or eat it with pita chips.

Enjoy!

-Motivated Mommy Clayton

You can always find me at my Beachbody website!

Monday, December 22, 2014

Sun Dried Tomato Basil Quinoa Burgers

I know, I know! Kaitlyn, why are you messing with the holy goodness of burgers?! My friends, these protein packed deliciousness will blow your mind! I absolutely love these. On that note, my Husband is not sold.. He doesn't like the idea of messing with a MAN burger. Whenever I make these he refers to the Bud Light commercial of the guy cooking his Wifes quinoa burgers at the tailgate. Makes me laugh every time I watch it!
On that note, Isaac will eat them. And... It's more for me!
You can mix these up any way your heart desires. I am a huge fan of the sun dried tomato basil combo. I have done broccoli cheese, but always come back to this. Maybe next time I will attempt mushroom and swiss.. I'm getting hungry..

Sun Dried Tomato Basil Quinoa Burgers:

1 cup uncooked Quinoa (I followed the instructions on the packet)
3/4 cup cheese (I use a mozzarella and cheddar blend)
1/2 cup sun dried tomatoes (I used the whole container I bought from Copp's. The second time I used a bag I found at Woodman's)
2 eggs
3 tbsps Whole Wheat Flour
8 large leaves Basil (I really just eye this, and add the amount I think will be to my preference)
2 tbsps Coconut Oil

Once you have your quinoa cooked, let it cool. Once it is cool, add all ingredients together (NOT the coconut oil). If I find that my mixture is to soupy, I add a little more flour. Last time I didn't strain the quinoa very well, and had to double the flour.
Once all your ingredients are combined get out a cookie sheet, and line with parchment paper.
Form the mixture into patties. I liked smaller patties, and got about 6 out of this batch.
If you have time put them in the refrigerator for an hour or so. If it is any longer, make sure to cover them. I found that cooking them when they have had time to combine is a lot less messy.
When you are ready to cook them heat the coconut oil in a skillet. Cook the patties on each side for 2-3 minutes, or until lightly golden.
If the patties are to thick you will need to finish cooking them in the oven. I did this once.. I put them in the oven at 350 for about 30 minutes.. It was a sad day waiting for these.
Keeping them smaller and thin will allow you to eat them right away.

Once they are done cooking, let them cool and chow down! If I need a little zip, I will top them with a little balsamic. So gosh darn good!!

Enjoy!

-Motivated Mommy Clayton

You can always find me at my Beachbody website!

Sunday, December 21, 2014

Jeans Journey Justice

This is exactly how I felt after having both babies. After Isaac I just continued to squeeze into my maternity jeans. And those were small! When I got pregnant with Henry I moved up to maxi dresses.  Nothing else fit! I was so depressed!  I figured I would grin and bare it till after I had Henry. 

You know when you are so far past where you want to be you dont even know where to begin? That is how I felt. I kept pinning workouts and good food.... And continued to eat out. I was cramming in as much crap as I could before I had Henry.
Once I was cleared by the doctor to exercise, I started the 21 Day Fix. I was determined to make it work. After one round I was amazed. I saw results,  and was ready to attack another round. 

The 21 Day Fix and Shakeology are the reason I am where I'm at.
It is worth every penny!

Enjoy!

-Motivated Mommy Clayton

You can always find me on my website!
Shoot for the moon. If you don't make it to the moon you will land among the stars.

Wednesday, December 17, 2014

Workout High? Please... More Like Wiped Out!


 Runners high? Workout high? Endorphin overload? No matter which way you say it... I don't get it! Never have I ever felt super pumped after a workout.
Dead as a door nail. Pooped. Wiped out. Down for the count. Now those terms I can relate to! When I finish a workout I am ready for bed! I get my sweat on right after I put the kiddos to bed, and you best believe Mommy is headed to bed after she burns her calories. Can you relate?

When I miss a work out, the next day I am dragging! And I am talking blood shot eyes, hands dragging on the ground like a caveman, let me drink my Shakeology before we speak... It's pretty pitiful. Not only is it hard for me to get going during the day, but I find it hard to wake up!

Lets be real, I LOVE how I feel from working out, but some nights Momma needs a glass of wine, followed by her big, fluffy pillow. I pay for it the next day, but in that moment it feels like heaven.

We are all human and get a get out of jail free card, but there is a price to pay when you miss your workout. I feel so energized the next day! It is truly a great feeling to sail through the day with energy and a smile on my face.

I have never felt like I am right where I belong. I finally feel like I am exactly where I should be. I love my amazing Husband and kiddos. I love coaching Beachbody. I love working at Theda Clark. I love my life. I am grateful each and everyday for all of the blessings in my life.

Enjoy your week! Smile!

Shoot for the moon. If you don't make it to the moon at least you will land among the stars.

-Motivated Mommy Clayton

You can always find me at my Beachbody site. Please don't hesitate to reach out to me with any questions!!


Tuesday, December 16, 2014

Pumpkin Delight Cottage Cheese

Do you have sweet tooth like I do? I cannot resist the sweets! It runs in the family. During the holidays you are surrounded by sugar filled, empty calorie sweets. These sweets really have no nutritious value to them.
It isn't always easy to stick to a diet, unless you have a reason to! I like to keep my 21 Day Fix or my PIYO diet fun, and delicious. That is what keeps me in line.
I am an avid snacker. I eat small snacks every couple of hours throughout the day, instead of three large meals. When I do smaller snacks it keeps me on track, and keeps up my metabolism. It also feels like I am eating more, when I'm not. 


This delicious snack is a new discovery. I used what I had in my cabinet, and BOOM! My tongue is still thanking me for this one. 

I love love love pie! I made my first Pumpkin Pie from scratch this year, and it turned out pretty good! With that being said, this has much more nutritional value! 

Here is the amazing recipe! 

Pumpkin Delight Cottage Cheese

1/2 cup Cottage Cheese
2 tbsp Pecans or nut of your choice
1/2 tsp Pumpkin Pie Spice
Small drizzling of honey on top

Oh man! Prepare your senses for this one! It's a real hit! 

Enjoy! 

-Motivated Mommy Clayton 

You can always find me on my Beachbody website. Please don't hesitate to ask me for more information!!

Thursday, December 11, 2014

Now That's What I Call High Quality H2O!

Water is NOT the devil, but those extra couple of pounds can sure feel like the devil!
Did you know the fastest way to shed a couple of pounds is to increase your water consumption? There is no easy answer to 'How Much Water Should I Drink a Day?'. When I am exercising and active I strive to drink half of my body weight in ounces per day. Since I am currently breastfeeding, I double that. With my challenge groups I challenge them to drink 100 ounces a day! 
It is not always easy to chug the water throughout the day so I have developed a couple of tasty tricks to keep my taste buds engaged! 
Something as simple as adding fruit can make a real difference. Here are a couple of recipes that you can use to help you with your daily water consumption. Just make them up the night before, and take them to work with you!! 

Feeling Fine with Lemon and Lime

1/2 a cucumber, sliced

1/2 a lime, sliced
1/2 a lemon, sliced

Minty Cucumber Lime

1/2 a cucumber, sliced

1/2 a lime, sliced
1/4 cup fresh mint leaves

Strawberry-Lemon with Basil

1/2 cup sliced strawberries

1/2 a lemon, sliced
1/4 cup fresh basil leaves

Watermelon Mint

1 cup cubed watermelon

1/4 cup fresh mint leaves


Any one of these is a great option! My go to's are cucumber with lemon, or mint. It is very refreshing!
What is your favorite blend? 


You can always find me on my Beachbody page.
Always shoot for the moon! If you don't make it to the moon, at least you will land among the stars! 


Enjoy!
-Motivated Mommy Clayton-

Monday, December 8, 2014

The Art of the Splinter Family Candy Cane

The Splinter family has had a long tradition of making candy every year before Christmas. My Great Grandfather owned a Candy Shoppe in Madison, WI. My Grandpa had one large sweet tooth! There was always candy in the house!
In the past we have always made Candy Canes, Peanut Brittle, and Anise. We have also made caramels, toffee, chocolate covered peanuts, and many more! This weekend we made my grandparents proud by making Candy Canes, Peanut Brittle, Cashew Brittle, and Anise. Every last batch turned out absolutely delicious. Is your mouth watering yet??
We had a couple of visitors along the way.
Thanks for stopping by Melissa and Stacy!
Lets get in to the sugary details! We will just be looking into Candy Canes today. It all starts with glucose... Baking it to a specific temperature, adding a couple more ingredients... And then the fun starts!!
Once everything is cooked, you pour it on to the marble, let is settle for a short period of time, and then it is time to work it. Work it good. Work it right!
 First you have to get everything worked into a pile. Once it is into a pile, you have to break out a small portion to add color to. The rest gets 'pulled' on the pole to aerate it. This is what turns the mixture white. While it is being pulled we pour flavoring over it to give it taste. This batch was peppermint. Sinuses... Instantly cleared!
The rest of the batch gets color added.
This little guy got some red added. This HOT HOT HOT portion is worked till the color is completely worked in. Keep in mind it cools off very quickly. Quick hands make the best candy.

Lets move on the more HOT details!
The color and white are combined into a brick. **Please do not attempt to build an oven like the one we have. Our inventive Grandfather made this... Let's just say the children were gated in the living room...** 
Now that the sugar brick is about ready to go, the Candy Cane magic begins!! 
You have to pull, work, and roll out the end of the 'brick'. This is where the art of the candy making touch comes into play. This is not easy people! I have done a couple batches... They turned out a bit sad.. 
My mother learned from her Father and Mother. She has the touch! She is rolling out the end. When it is to her desired length she cuts it, passes it off, and continues till the 'brick' is gone! 
She passes it to the assembly line... 
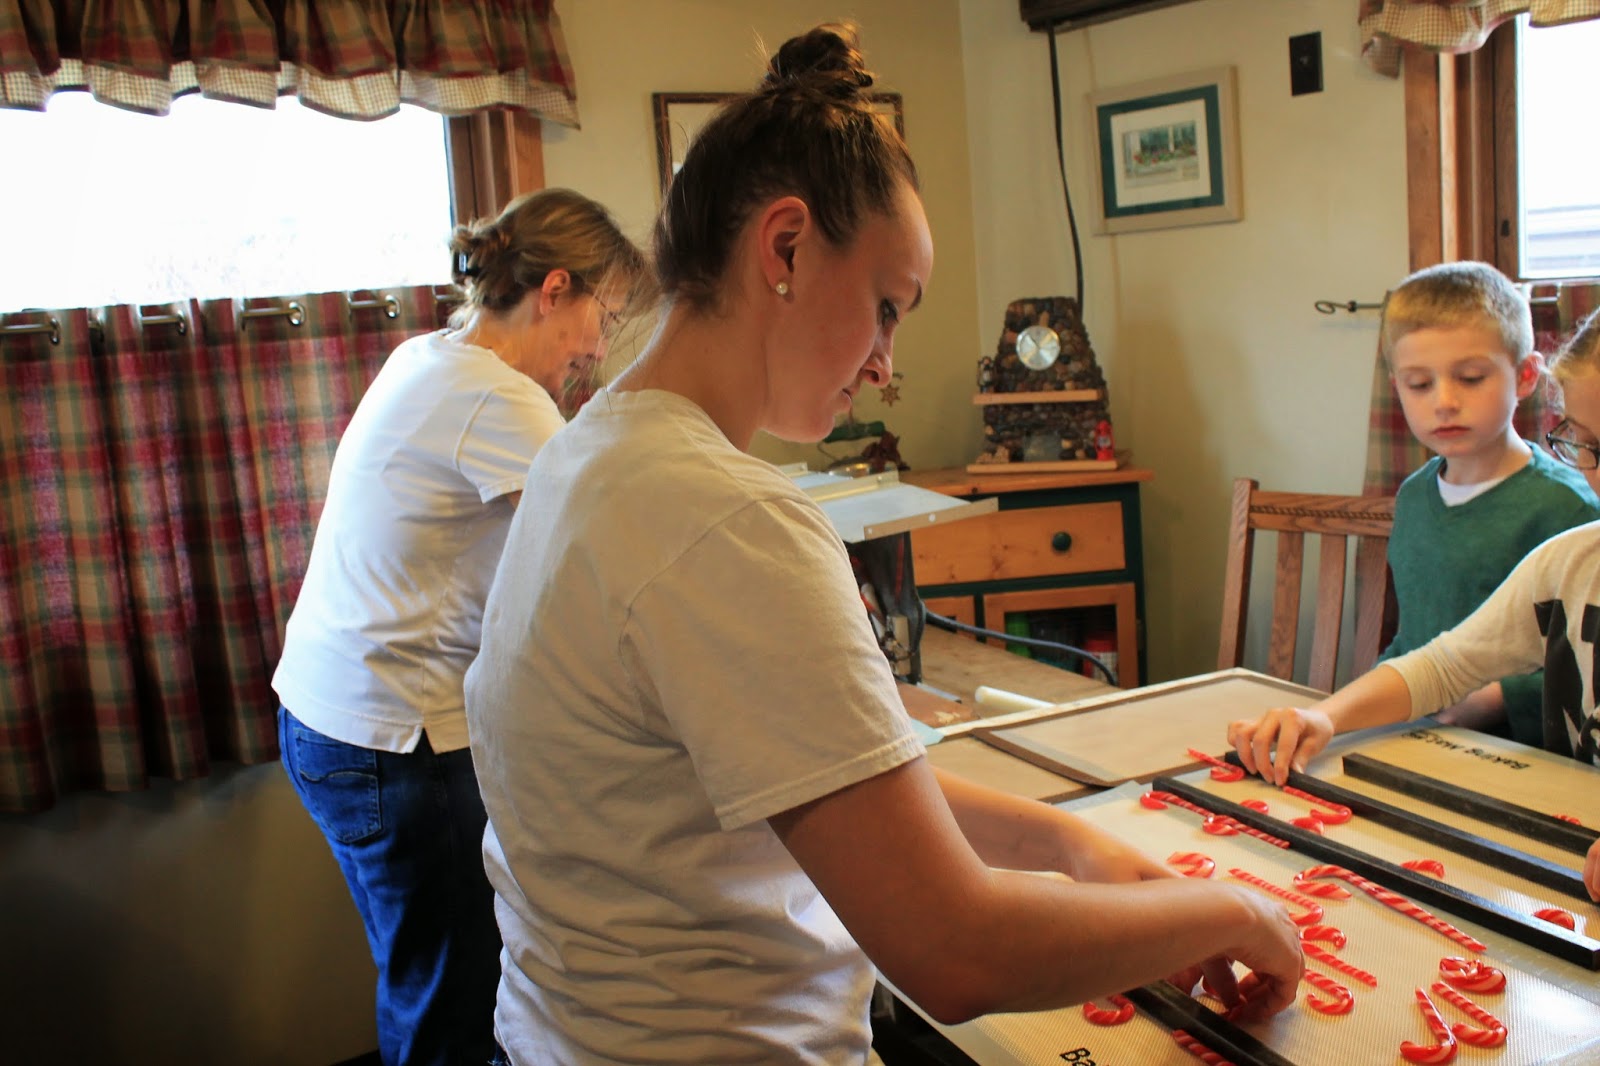
The helpful assembly line 'crooks' the Candy Canes. They hand shape each one with love. When Grandma was still with us she would correct your form. She had the perfect crook. Her swift and tender hands shaped the candy with love. She never had an imperfect cane. Ever. 
If you aren't quick, the canes crack, and you are not able to get your desired shape. 
Once the canes are cool they come off the assembly line and into our tummy's... I mean, containers. We put most of them on our Christmas tree, and share them with friends. 
 The kids are  great helpers, and enjoy the art of Canes! 

Hope you enjoyed a glimpse into one of our treasured family traditions. What are your holiday traditions? 

Enjoy! 

-Motivated Mommy Clayton

Thursday, December 4, 2014

Crock Pot Shredded Chicken Tacos

My friends, I apologize for the awful picture. We were done with dinner and I realized I hadn't taken a picture. I made 2 pounds of chicken and this was all that was left! Needless to say this is a HUGE hit in our house. It is very very Husband and kiddo approved. Isaac had several bowls full of meat, as did Jason. I opted to put the chicken into a wrap with a little cheese. No matter how you spin it, this dish is delicious! Did I mention it is healthy lifestyle friendly as well?? Crock pot win!
Can you dig a meal that is easy, brainless, and waistline friendly? I know I can! It's a dump and dash meal.

Lets go over how to create another winner, winner, chicken dinner!!

Crock Pot Shredded Chicken Tacos:
2 lbs Chicken Breasts
2 heaping tbsps Taco Seasoning (you can easily make your own)
4 Tomatoes
1/4 cup cilantro
1-2 cups mushrooms

Optional Ingredients:
1 yellow pepper
1 red pepper
1/2 onion

Instructions:
Chop up the tomatoes and mushrooms. Thaw out the chicken. Turn on the Crock Pot. Toss everything in. Go about your day. Let cook on high for 2-3 hours, or on low for 7 hours. Once the chicken is cooked through and tender, shred, and eat!
Boom. Mom of the year award goes to you!

Enjoy!

Wednesday, December 3, 2014

BBQ Pulled Pork Stuffed Sweet Potatoes


Well it was a sad day in our household tonight. I didn't get the pork into the slow cooker until 4pm.. Needless to say we had eggs for dinner, and this wonderful food will be lunch tomorrow. I am a true chef, and had plenty of taste tests while cooking this one.
This is a great balance of protein and carbs. It is a lower calorie food without sacraficing flavor. I did have to slap Jason's hand a couple of times to make sure we had plenty for lunch tomorrow. Isaac did get a taste test as well, and had a bowl full! Husband and kiddo approved!!
Since I did not get this done in time for dinner the 'stuffed' portion of the recipe is a little modified.. Oh well!

You need realistic recipes that keep you on track, and make you feel like you are cheating. This is the perfect recipe to do that! Here it is!!

3 medium Sweet Potatoes
2 pounds Pork Roast
1 can Beef Broth
1/2 tsp Chili Powder
1/2 tsp Ground Cumin
1/2 tsp Salt
1/2 tsp Pepper
1/2 tsp Garlic Powder
1 cup BBQ sauce (I used Sweet Baby Ray's)
1/4 cup Apple Cider Vinegar
1 tbsp Brown Sugar
1 tsp Worcestershire Sauce

Start by combining your Chili Powder, Ground Cumin, Salt, Pepper, and Garlic Powder. Once this is combined, put your beef broth in the Crock Pot. Cover the meat in the mixture, and put it in the Crock Pot. If you would like more rub, you can add any spices you would like. I added more Chili Powder.
Let that cook on low for 8 hours, or high for 4 hours. It is best to cook it low and slow. This breaks down the meat, and makes it easy to shred.
When there is about 40 minutes left to cook the meat, preheat your oven to 400 and start the sweet potatoes. I quartered them, and placed them on a baking sheet lined with aluminum foil. I placed them on the cooking sheet and put them in the oven when it was fully preheated. Turn the potatoes after 20 minutes.
When the meat is done, shred all of the meat, and drain the juices.
Combine the Worcestershire Sauce, Brown Sugar, BBQ sauce, and Apple Cider Vinegar in a bowl. Combine meat and sauce.
When everything is done you can serve the sweet potatoes and top them with the meat.

Enjoy!!

Tuesday, December 2, 2014

Homemade Fabric Softener

It has been over a year since I started making my own fabric softener. It has saved me a TON of money. I know there are several versions, but I wanted the most basic, least amount of ingredients I could find.
I started making my own fabric softener because my youngest son Isaac was having sensitive skin issues. The laundry detergent is the first place to reduce the amount of chemicals your children come in physical contact with. My first instinct took me to my favorite place... Pinterest. I found a great recipe and have stuck with it!
This recipe makes about a bottle in a half. I just saved my old fabric softener, washed out the bottles, and used those. Maybe one day I will get all fancy, head to Hobby Lobby and pick a cool bottle. Until that day, I just use what I have.

Fabric Softener Recipe:
1 1/4 cups warm water
8 cups Vinegar
1 cup Baking Soda
**Optional** Several drops of essential oil (This is to give your fabric softener scent. You can use a little or a lot. I tend to use a lot because I love the scent that I have. I am currently using Jasmine Once this bottle is finished I will be moving to Lavender.)

Combine the warm water, vinegar, and essential oils in a large pail. Mix those ingredients. Slowly combine in the baking soda, Be sure to constantly stir the mixture as you add the Baking Soda. The large pail is essential for this part. The Baking Soda and Vinegar cause a chemical reaction. You will need plenty of room for this to bubble up.
Once everything is combine, use a funnel to pour into the bottles. No need to be a hero and try and pour it without the funnel. Trust me.. I tried.. It makes a mess.

This is HE washer safe. We have an HE washer, and I have not had any problems. I use about 1/4 cup per cycle. The original recipe recommends 1/2 cup to 1 cup. It is totally up to you and what your preference is.

Enjoy!

Friday, November 28, 2014

Spaghetti Squash and Meatballs


Tonight's meal.... Spaghetti Squash and Turkey Meatballs! Sometimes making a meal a little more fat burning friendly can really help the waist line. Each time I make this meal, I add or change a little bit of something. I generally try to use what is in my pantry and go from there.
Hope you enjoy this spin on a traditional Italian meal!

Spaghetti & Sauce:
4 diced tomatoes
2 diced peppers (this time I used a yellow and a red pepper)
1 small can tomato paste
1 quartered spaghetti squash

Put all ingredients into a Crock Pot and cook on high for 3 hours, or until you are able to scrape spaghetti squash off of outer shell. Once you are able to scrape it off, cook to your liking. If you prefer it more crunchy you will cook for less than 3 hours.

Meatballs:
1 lb meat (I do ground turkey. You can do whatever your heart desires)
1/2 tsp Worcestershire
1/2 cup breadcrumbs (I use Italian, but just use what you have)
1 dash of salt
1 dash of pepper
1/4 cup of milk (I use almond milk because that is what we have in the house)
1 tsp basil
2 tbsp onion
1 tsp chili powder
1 egg

Preheat oven to 350. Prepare a baking sheet with parchment paper. Mix all ingredients together. Roll meatballs into 1 inch balls. Place each on baking sheet. We generally get just under 3 dozen.
Bake meatballs for 15 minutes, and then turn them over. Bake for an additional 15 minutes.

If you would like everything to mingle add the meatballs to the crock pot for the last 30 minutes.

The meatballs are generally gone at the end of dinner for us. I think the next time I make it I will double the meatball portion. Isaac eats the meatballs plain, and has about a half a dozen to himself.
I forgot to put mushrooms in this time of round, but generally put them into the sauce. Jason is a major meatball fan, so he doesn't mind this alternative! Husband and kiddo approved! Mission accomplished.

Sunday, November 23, 2014

Apple Cinnamon Steel Cut Oats!

Yummo! On the left is one of my absolute favorites. Apple Cinnamon Steel Cut Oats. I put it in a small Pyrex container and take it to work. I generally make this at a minimum once a week. It is so easy and delicious that it is hard not to!
I have become an avid Crock Pot user. When you have two children under two you find every way possible to make your life easy. When I can just throw ingredients in a heating source I am all for it.
I originally found the recipe on Pinterest, but it came out wayyy to soupy. I prefer it to be less soupy. If you are a soupy fan, then just add more water or milk. This is the most recent recipe I have used:
3 Peeled and Cubed Apples (choose whichever kind suits your fancy)
1 1/2 Cups Steel Cut Oats
2 Tbsp Brown Sugar
1 tsp Salt
1 tbsp Cinnamon
3 Cups Almond Milk (You can use whatever kind of milk your heart desires)
1 Cup Water
1/4 Cup Raisins (Optional)

You literally put everything in the Crocker and let it cook overnight on low. Now... Here's the problem with that.. The first batch stuck to the sides, and we literally had to soak it for days to get everything off. If you so choose to cook this overnight, just get a bag. If you happen to be around the house when you cook it, cook it on high for 3 hours. Scrape the sides when you are one hour into it. After that first hour, scrape the sides every 30 minutes. Not only will this prevent everything from sticking, but it will keep the oats cooking evenly.

As you can see I used a small Crocker to make them. Next round I am going to do a double batch in the big pot. The nice thing about reducing the liquids is that I will heat them up, and add a little milk. I also added some walnuts after I heated them as well.

This is the perfect winter breakfast! This is kiddo tested and husband approved. Isaac devours these, and Jason is not shy about taking a large container to work.

Saturday, November 22, 2014

White Chocolate Cranberry Oatmeal Cookies

Whats cookin' good lookin'? In my kitchen you will find some hot off the press White Chocolate Cranberry Oatmeal Cookies. Are they totally diet approved? No. No, they are not. I live by the 80-20 rule. 20% of the time I am a little naughty. I am only human. If somone was 100% all the time they would go nuts. These bad boys are a guilty pleasure. They have oatmeal and cranberries. Were good! 
I changed the original recipe I found on Pinterest as I didn't have everything it called for. I was craving sweet fruit and the cookie goodness. These are Isaac approved. Jason is hunting so he will get to try them if there are any left!!

So, I used the following recipe:

1/2 cup softened butter
3/4 cup sugar
1/4 cup brown sugar
1/2 tsp almond extract 
1 egg
1/2 tsp cinnamon
1/2 tsp nutmeg
1/2 tsp baking soda
1/4 tsp salt
1 cup whole wheat flour
1 1/2 cups old fashioned oats 
3/4 cups dried cranberries 
1 cup white chocolate chips


  1. Preheat your oven to 350 degrees. In a large bowl combine the sugar, brown sugar, and butter with the paddle attachment. 
  2. Add the egg and almond extract and mix well.
  3. Add the cinnamon, nutmeg, baking soda, salt, and flour. 
  4. Fold in the oatmeal, dried cranberries, and white chocolate chips. 
  5. Roll the dough into 1 inch balls. Place them on a parchment lined or greased baking sheet 2 inches apart. 
  6. Bake 10-15 minutes or until the edges are lightly golden. 
  7. Let cool 5 minutes before removing from baking sheet. 
  8. Enjoy every, last, one!! 

Friday, November 21, 2014

Footprints on the Moon

You can do anything you set your mind to. I am here to help! Lets talk about what your fitness goals are, what your currently doing, and how we can get you to your goals! 
There is no limit to what you can do when you put your mind to it!

How it all began.

My fitness journey began after I had two children, and had a wedding in a couple of months. Looking at my wedding dress, and dreading my wedding pictures was not what I wanted. I knew that I had to make a change to love what I saw in the mirror.
Lets be honest, I hadn't worked out consistently since swimming class in college. Before that, sophomore year of high school when I played 3 sports. Crazy to think about it that way! In college I packed on the pounds. I partied, ate, slept, and went to class. Working out??? Nahhhh. I had a social life to attend to. I was very conscious about wearing loose clothes, and things that would hide my love handles, thunder thighs, etc.. The only reason I didn't gain more weight is because I walked to and from class everyday. I tended to power walk to write that off as working out.
When I graduated I entered the professional setting. My clothes slowly got more and more tight. I would just retire them and buy new ones. I was doing laundry at least once a week because I only had a couple pairs of pants that I fit in! Did that get my butt in gear?? Nooooo.
When I found out I was pregnant with my first child Isaac, I immediately went out and bought maternity pants. They fit a little tight, but I told myself I could squeeze into them. As the months progressed, and the pants got more snug, I wore sundresses... Once I had Isaac, I lost most of the baby weight from breast feeding. I got lucky..
When I found out I was pregnant with our second baby, Henry, I knew I had to be a little more tame on the eating out, and greasy food. I didn't gain as much weight during pregnancy, but my clothes still were tight.
After I had Henry, our wedding was only a couple months away. My sister had just completed the 21 Day Fix, and I decided to give it a go. What did I have to lose?! I have to be honest, when I saw the price I got nervous. So Jason and I decided to take it one month at a time. We decided as a couple to do the program. If we did not get results, we would stop the Shakeology, and move on. It was an investment in ourselves, and we knew we had to start somewhere.
With the help of the online Challenge Group, we got a great start. We stuck to the workouts, followed the diet plan, and listened to our coach. We have now done the 21 Day Fix 3 times. Jason has lost 30 pounds, and I have lost 25.
I must say doing the program as a couple truly helped us both excel. We were able to eat the same things, and make it work for us.
This is where my fitness journey began. Here's to a lifetime of making it work!
My Results Photos
My Fitness Programs